Testing is an important part of software development, yet is often neglected in many projects. We felt our code base for vAccel had reached a stage where the foundations for a proper testing framework would be a good decision.
Introducing a testing framework early on would allow us to identify and fix bugs and errors in our code faster. It would also allow us to implement tests easily and faster. In this post, we will look at the initial setup we used for testing and the testing frameworks and methods we considered before finally ending up with our framework of choice, Catch2.
Initially, we used Google Test, which is a testing framework written in C++ and is a very popular testing framework. In fact, it was the most popular according to this survey by JetBrains.
Surprisingly (or unsurprisingly), a large majority in this survey don’t test at all - fortunately, we will not follow this approach. Google Test is a really good testing framework and is full of many features which can be useful in complex projects. However, for vAccel, it is a bit overkill and quite hard to write tests for as we will see later.
This forms part of the desire of wanting to switch to a different testing framework - if the framework allows tests to be written in a faster and efficient manner, it will encourage us to write tests in the first place - which is a good thing!
Initial Google Test setup Link to heading
Let’s dive into the very rudimentary test we had, written using Google Test.
 1class PluginTests : public ::testing::Test {
 2    static int fini(void)
 3    {
 4        return VACCEL_OK;
 5    }
 6    static int init(void)
 7    {
 8        return VACCEL_OK;
 9    }
10
11protected:
12    /* initialize structures with zeros */
13    struct vaccel_plugin plugin = {0};
14    struct vaccel_plugin_info pinfo = {0};
15
16    void SetUp() override
17    {
18        plugin.info = &this->pinfo;
19        plugin.info->name = pname;
20        list_init_entry(&plugin.entry);
21        list_init_entry(&plugin.ops);
22        plugin.info->init = init;
23        plugin.info->fini = fini;
24
25        plugins_bootstrap();
26    }
27
28    void TearDown() override
29    {
30        plugins_shutdown();
31    }
32};
Here we provide definitions for SetUp() and TearDown() in the fixture PluginTests. We can then use this fixture in the following way:
1TEST_F(PluginTests, plugin_init_null) {
2    ASSERT_EQ(register_plugin(NULL), VACCEL_EINVAL);
3}
In this basic test, SetUp() is ran before asserting our function register_plugin(NULL) is equal to VACCEL_EINVAL. To wrap up our test, TearDown() is executed last and that’s our basic test done!
This seems rather straightforward, and it is! However, this is only one test and if we want to use other fixtures in our test files, it gets convoluted very quickly and the readability of the tests goes downhill very fast. Of course, this is fine and we could have carried on using Google Test as our framework and be done with it but since we are at an early stage it is relatively easy to change our approach and see if anything else fits better for vAccel. A key thing with GTest was that it is possible to include in the CMake process which is useful for our build process.
Unity? Link to heading
One of the frameworks we looked at was Unity - which is a framework written in C. Unlike Google Test, to include Unity in our testing directory, we just #include "unity.h" in our testing file and that’s it!
Tests in unity are straightforward:
Again, we have a setUp() and tearDown():
 1void setUp(void)
 2{
 3    plugin.info = &pinfo;
 4    pinfo.name = pname;
 5    list_init_entry(&plugin.entry);
 6    list_init_entry(&plugin.ops);
 7    pinfo.init = init;
 8    pinfo.fini = fini;
 9
10    plugins_bootstrap();
11}
12
13void tearDown(void)
14{
15    plugins_shutdown();
16}
Our basic test would be as follows:
1void test_plugin_null(void)
2{
3    TEST_ASSERT_EQUAL(register_plugin(NULL), VACCEL_EINVAL);
4}
Like GTest, we have a setUp and TearDown function and for our assertion macro we use TEST_ASSERT_EQUAL. From a readability standpoint, this is easier to read than GTest. The main issue we found with Unity is that having different fixtures in the same file is difficult and in many cases, it’s just easier to create a new file instead. This is rather tedious and having several files for one source file we are testing is not ideal so we now instead cast our eyes at Catch2.
Finally, Catch2 Link to heading
Catch2, just like Unity, uses a single header file. We just drag and drop the header in our testing directory - which is very convenient! Let’s start again with our basic test written in Catch2 this time.
 1TEST_CASE("plugin_register") {
 2
 3    int ret;
 4    struct vaccel_plugin plugin;
 5    struct vaccel_plugin_info pinfo;
 6    plugin.info = &pinfo;
 7    plugin.info->name = pname;
 8    list_init_entry(&plugin.entry);
 9    list_init_entry(&plugin.ops);
10    plugin.info->init = init;
11    plugin.info->fini = fini;
12
13    ret = plugins_bootstrap();
14    REQUIRE(ret == VACCEL_OK);
15
16    ret = register_plugin(&plugin);
17    REQUIRE(ret == VACCEL_OK);
18
19    ret = plugins_shutdown();
20    REQUIRE(ret == VACCEL_OK);
21}
As before, this is quite readable but Catch2 does not encourage the use of traditional fixtures, unlike the other two frameworks we have looked at. Catch2 uses an alternative syntax (as well as traditional fixtures) using BDD-style test cases (Behaviour Driven Development). With the use of SECTIONS, we can write our tests more expressively.
 1TEST_CASE("plugin_register") {
 2
 3    struct vaccel_plugin plugin;
 4    struct vaccel_plugin_info pinfo;
 5    plugin.info = &pinfo;
 6    plugin.info->name = pname;
 7    list_init_entry(&plugin.entry);
 8    list_init_entry(&plugin.ops);
 9    plugin.info->init = init;
10    plugin.info->fini = fini;
11
12    plugins_bootstrap();
13
14    SECTION("normal plugin initialisation")
15    {
16        REQUIRE(register_plugin(&plugin) == VACCEL_OK);
17        REQUIRE(unregister_plugin(&plugin) == VACCEL_OK);
18    }
19
20    SECTION("null plugin initialisation")
21    {
22        REQUIRE(register_plugin(NULL) == VACCEL_EINVAL);
23    }
24
25    plugins_shutdown();
26}
Nice! We have our startup and tear down functions within our TEST_CASE and we can separate different tests from each other as well, without them interfering with each other. These sections can also be nested and for our approach we generally use a test case per function/class and then a section for each function branch or method. The assertions are also expressive as well with REQUIRE and CHECK, which just relies on the natural C++ syntax for conditions which is also nice. The test case names can also be descriptive as well - just a regular string compared to the valid identifier GTest makes you use.
As part of our testing framework, we also include it in our CMake process, simply by using -DENABLE_TESTS=ON when we make and run the tests automatically using make test with CTest. It is seamless compared to GTest integration with CMake, perfect!
However, a downside we found during initial testing is that there seems to be no way to set breakpoints in tests. A workaround used for now is to set breakpoints in the code which was being tested - this is not a deal-breaker at the moment.
Updating our CI/CD Link to heading
Whilst we were at it, we also updated our CI workflow using GitHub Actions.
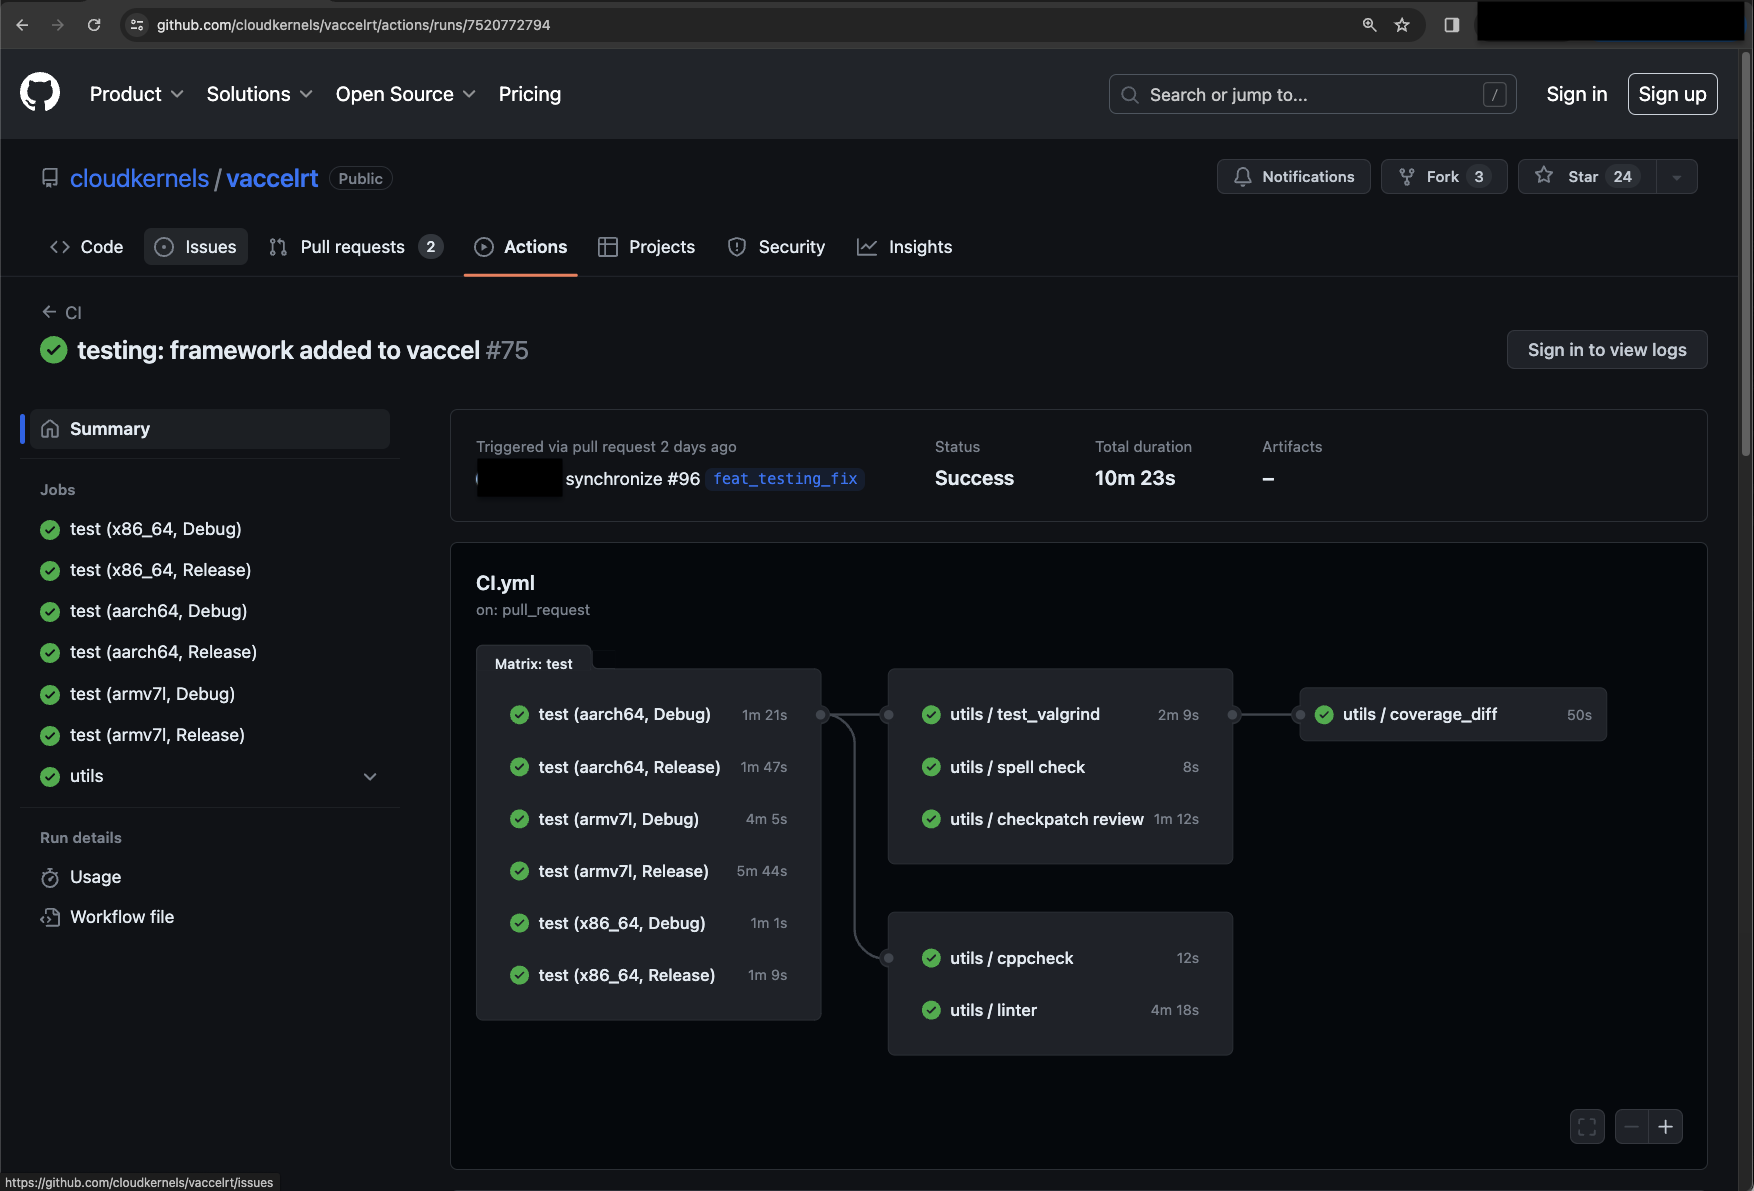
We first run our tests - make sure they pass for all the architectures we build for. When this passes, we run Valgrind memory leak tests, a few linters, a spellcheck and a check to see if the commit meets the standards it should.
Here is our testing pipeline:
When our PR is merged, this triggers another pipeline which deploys our code and binaries as seen here:
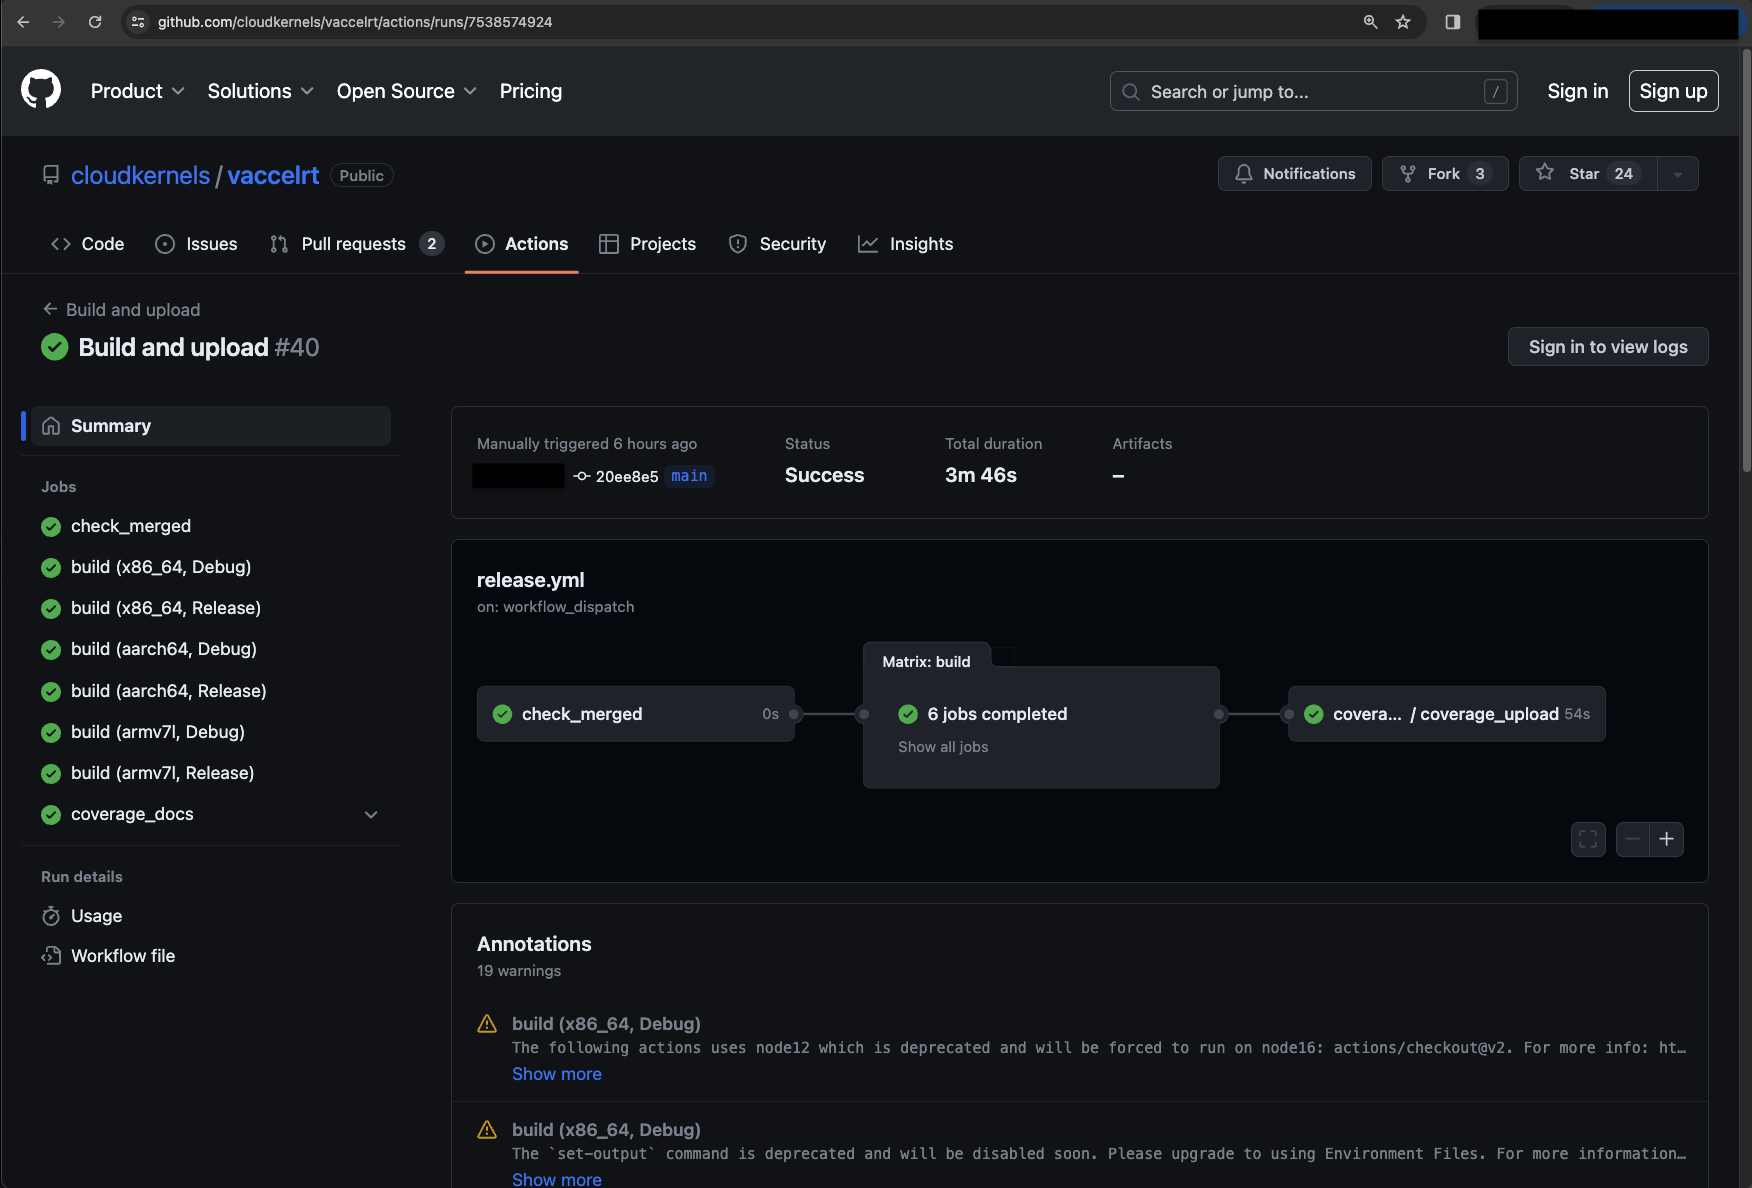
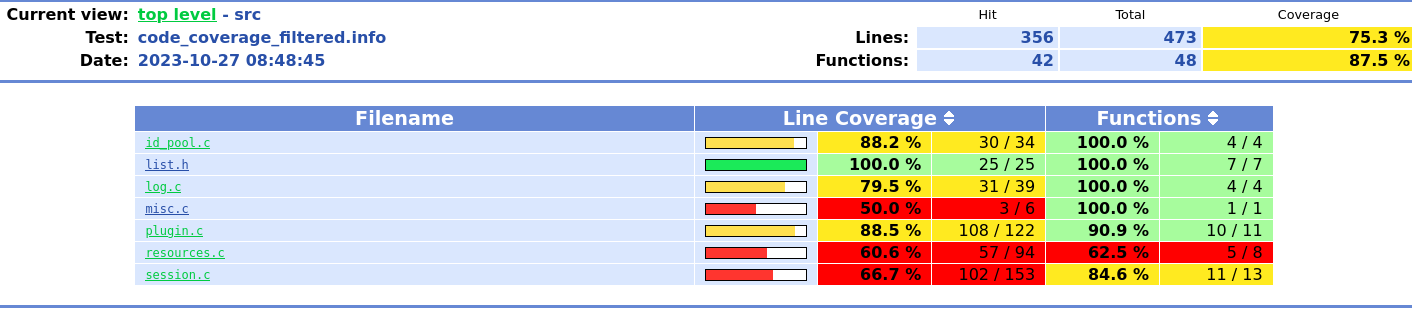
In the end, we check the coverage for our tests for our source code to make sure new code is being tested and our old tests still run fine. A final coverage markdown table is created and uploaded to our docs.
The coverage can also be seen in a detailed html view which provides testing feedback immediately when initially writing tests on a local build.
Finally Link to heading
For our testing framework, we switched to Catch2. The reasons are simple. A drag-and-drop single header file, easy to integrate with CMake and readable tests.
With the initial start on the testing framework, we added several tools to help with the testing of the code as well such as Valgrind, linters, static code analysers etc. In the end, these are all tools we can use to make sure the code that is written is as foolproof as it can be from the get-go. With the use of GitHub actions, it is now an integral part of the CI/CD tools of the code base and can be easily extended in the future as well.